Tuesday, June 11, 2013

An explanation....

So I have been MIA for a bit but there are reasons behind it.  Let's go back to March.  In March to mid April I had a huge project that took all my spare time.  What was this project you ask?  Well one of our Ohana was married in the Los Angeles Temple.

Arent't they a cute couple?  

Well I was so busy because I made her three bridesmaids dresses AND her wedding dress.  This wasn't my first wedding dress (its my fourth) but I have decided that with me working full time wedding dresses are too time consuming so only a few people that are still single will be able to pull me out of wedding dress retirement for the time being.  You can check out more gorgeous photos by the talented Kristi HERE.

(Her wedding dress was 5 layers in all with a pleated tulle bodice, that was a miracle in itself!)


I mentioned before that The Hubby is a composer' well he worked with the creator of Dweller and the original soundtrack was finally released.  Along with that came the launching of a collaborative video game and media scoring venture with a fellow composer. 

Then to make life even busier we moved!  It is probably no more than 2 miles from our old apartment but we love the extra space and are in a new city and zip code.  With the new place came my own sewing and art space for the first time in years so many more projects are getting done now that we are fully moved in and settled.  The first projects were more home based and I will post pictures this next week of how we made this townhouse style place into our own home.

It has been a busy time for us and between school, working full time and sewing projects the blog has taken a back seat.  I will try to keep up more often!

~
Eva

Thursday, May 30, 2013

Playroom Under the Stairs Make Over

I've always thought a playroom under the stairs would be so fun.  Our new place has the perfect space, but when we moved in we just kinda threw the toys in there and tried to make it organized.  I have to say, I am not a big fan of plastic toy bins.  I found things in there like rocks, hair bows, garbage, dirty socks.  It seems like everything found it's way in there.
 
I also wanted a playroom that would work for both genders as I have a boy and a girl.  I also didn't want to paint, so we started looking at wall decals.  Turns out they were the best idea ever!  They both decided on Sponge Bob Square Pants and after a trip to a few stores and about $85 this is the transformation we came up with.
They had so much fun putting Sponge Bob up and now they have to go and say good-bye to their playroom every night. So cute.
 
This space is right off of my laundry room, so they can use that space to play too.  I like doing laundry and having them right there playing.  It also wraps around the corner, but it angles down because that is the bottom of the stairs.  There's not much to do with it so we just put a little table and some toys that wouldn't fit anywhere else.  My little girls loves that space.  I guess it's perfect for her size.  Not me!
 
Smiles,
 
Vanessa


Sunday, May 19, 2013

As You Wish

A very talented sister in my ward has a craft day once a month and this month I was able to participate.  Kind of.  For those who want to make the craft, but can't make it, she puts together a kit.  See?  She's pretty wonderful, huh?
 
I chose to do a slat sign with the wording, "As You Wish" on it.  The Princess Bride is my all time favorite movie and recently we introduced this classic to our children.  It was perfect timing to  hang a sign with this saying in our house.  When we put it up, I asked what it meant and my son smiled and said, "I love you."
 
I asked my husband to hang it over the coat rack where the kiddos put their backpacks, coats, church bags and all sorts of things.  I want them to see that sign when they leave the house and know that I love them. 


It was super easy and even more fun to make.  I haven't done painting in awhile and now I want to paint everything!  The sign actually has 3 different coats of paint: medium blue, white and then black.
 
The Steps
 
1. Paint everything medium blue
2. After that has dried, paint everything white.
3. After that has dried, place the vinyl lettering on the board.
4. Paint everything black.
5. When the paint is almost dry, pull the vinyl lettering off.
6. When the paint is completely dry, sand the board lightly all over and more in spots where you want the color to show through underneath.
 
I LOVE the sign and it makes me very happy.  I am also looking forward to next month's craft and already have a few planned of my own. :)
 
Smiles,
 
Vanessa

Thursday, May 2, 2013

Our Little Fairy Oasis

The April edition of Family Fun had the cutest idea for a Toad Abode/Fairy House.  My daughter and I fell completely in love with it.  We ripped the picture out of the magazine and it has been hanging on our fridge ever since.
 
Family Fun Toad Abode Project
 
  On Monday, my little girl's sixth birthday, we decided it was time to start our little project.  With apprehension as a non gardener, I entered the gardening section of Lowe's and wandered throughout the whole section.  Thankfully, a few employees took pity on me and helped me find a few of the items I needed. 
 
After an hour of time and $67.00, we walked out with some plants, rocks, a pot base, moss, potting soil, a hose and tiles.  Wow.  Expensive!  If you are going to do this project, expect it to cost quite a bit.
 
Now we had all of the gardening supplies, but still needed a house and some miniature animals and furniture.  I live in a small town, so I'm pretty limited on stores.  Someone suggested the IFA store, which I'm guessing stands for International Farmers of America since I live in a farming community.  I decided to brave it and had quite a bit of fun.  They had baby chicks and so many other things you just don't see in the big city.
 
Unfortunately, I couldn't find anything but bird feeders, but I did luck out and found a hamster house that would work perfectly.  Then I picked up a miniature bunny and frog.  I'm still on the lookout for miniature furniture to put on our patio and a fence, but we can add that later.
 
Family Fun is pretty vague on the items you'll need, so I thought I'd share what I picked up.
 
What You'll Need
  • Potting Soil
  • Pea Gravel/Small Rocks
  • Sheet Moss
  • 3 kinds of plants (This is entirely up to you, but make sure you get something that doesn't spread.)
  • A sheet of miniature tile from the tile section at Lowe's or Home Depot (They are all attached to one sheet, just decide how big you want it and cut.  I found the cheapest sheet for $3.00.)
  • Large plastic plant saucer (Mine was about 20" and already had punch out drainage holes.  If it doesn't, you'll have to drill some holes in the bottom.)
  • Bird house (I used a wooden hamster house and painted it.)
  • Miniature animals (They have these in every toy section in most stores.  I've seen them at Walmart, Target, and Michael's, but I can't remember the brand name.  It does start with an S though.)
  • Miniature patio furniture (We are still on the lookout for this, but Family Fun said they used a Calico Critters toy set.  I googled this and they have this brand at Toys R Us, but no patio furniture.  We'll keep looking!)
  • Miniature fence set (Another piece of the puzzle we are searching for.  I guess you can find mini fences at any craft store, but alas, there is not one in my small town.)
And for those who are visual like myself:
 
The hamster house with mini animals and paints.

Our gardening supplies

Basic Potting Soil

The only bag I could find was large, but it was the same price as a small bag of decorative rocks.  So I bought it.

There were a few kinds of moss.  I chose the greenest.  Who knew moss came in bags!?

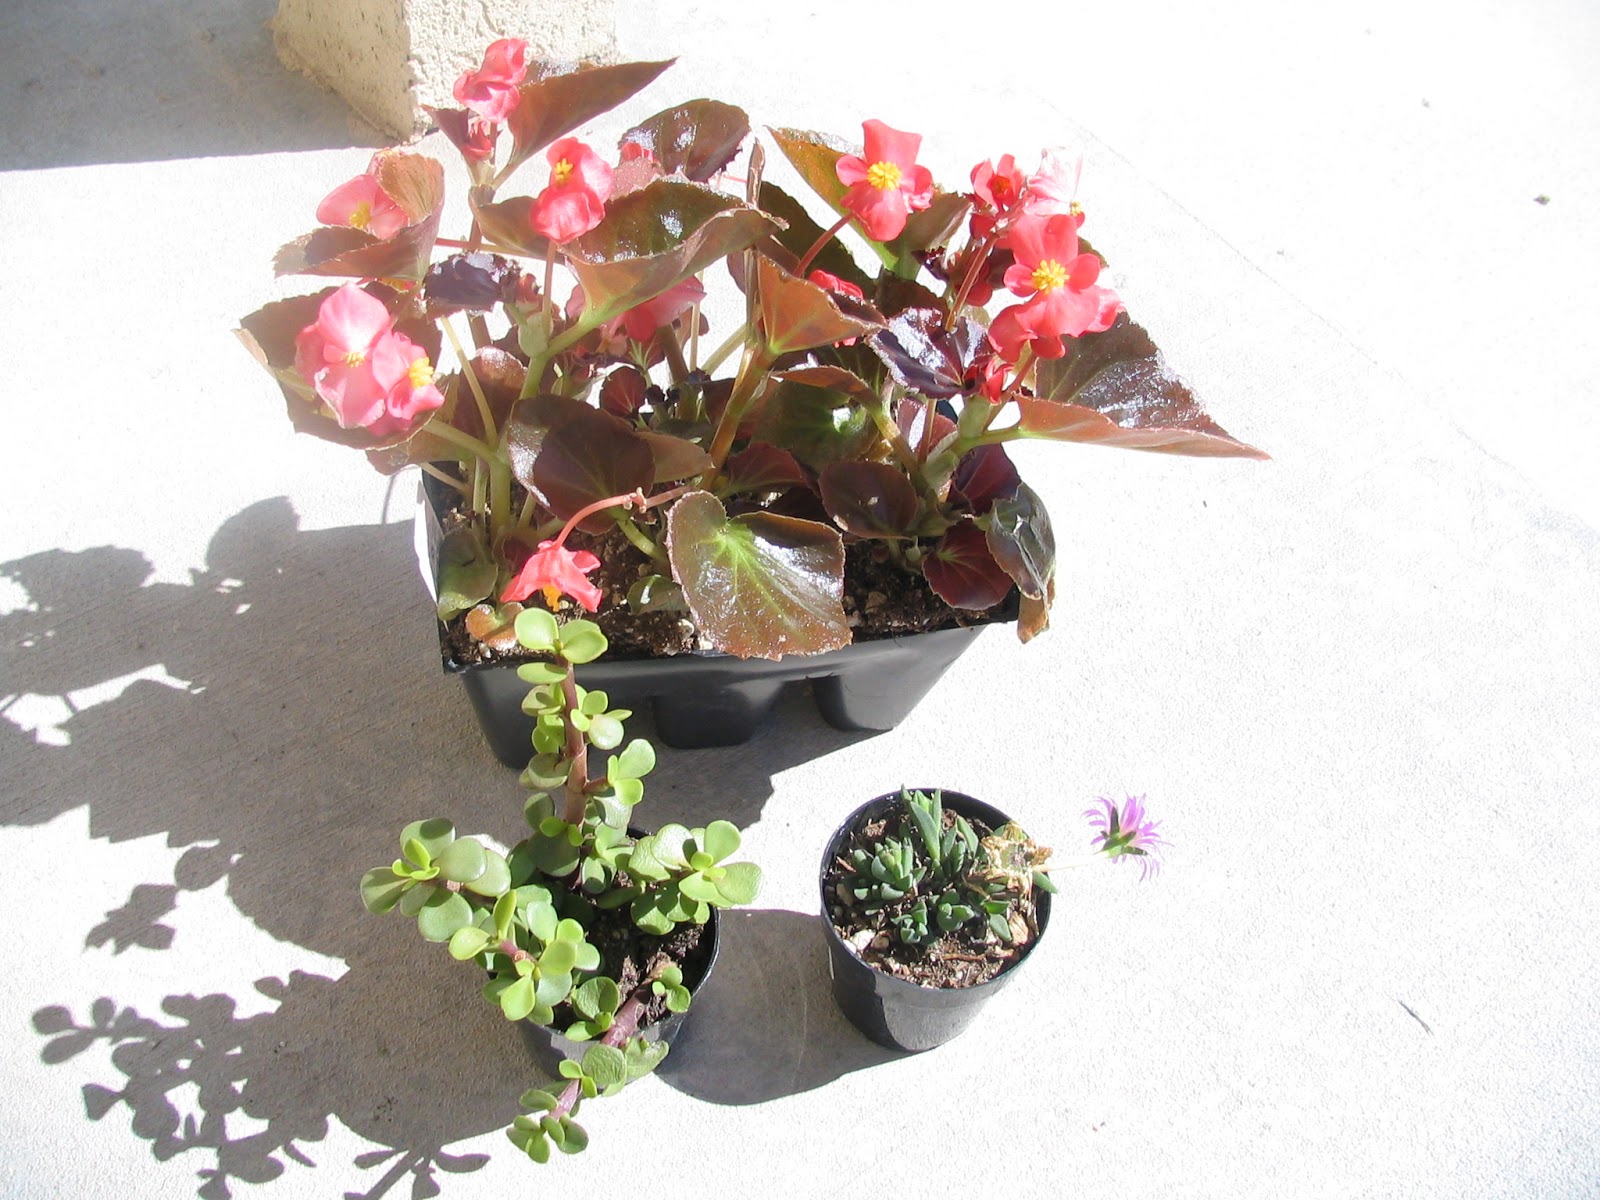
Begonias and two other plants, but I have no idea what kind they are!

Sheet of miniature tiles

Plastic plant saucer
 
 And then put it all together and what do you get?!
 
The finished product! (Minus the chairs and fence.)

We love it and keep looking outside to see if any fairies have taken up residence.
 This is a super fun (although pricey) gardening project.  I felt like a little girl again as we were putting it all together.  I can hardly wait for visitors to see what they think!

Smiles,
Vanessa

Monday, April 29, 2013

The Birthday I Silently Celebrate for Me

Today is my little girl's sixth birthday.  Every year I look back and reflect on her birth.  I'm sure this isn't uncommon for most mothers, but for me, it is a special day that I celebrate just for me in my own way.  For this is the day I felt I became a successful mother, even though she is my second child.
 
I don't think I can put it into any better words than what I wrote three years ago on her third birthday.  I just reread it again today and once again, it brought tears to my eyes.  I like to remember.  It brings back so many good memories and emotions.
 
If you are wondering what I am talking about, take a minute and click here to read my words.  It changed my life and maybe it will yours.
 
Smiles,
 
Vanessa

Thursday, April 25, 2013

The Simple Things in Live

I've been sewing, sewing, sewing.  In fact, I've been sewing so much I haven't even had time to take pictures.  I have even sewed a few of the projects we will be doing at the next Plumtickled Create.  I had fun, but there are a few changes I would make.  As a matter of fact, I already remade one of the projects with my adjustments.  After my monkey girl's birthday is over, I'll be back online with pictures.
 
For now, I wanted to share a moment in life that I witnessed last week.  I started taking one of the neighborhood kids to scouts with my son.  On the way home, my son asked this young boy if he had played Pirates 101 before.  This is a family favorite computer game.  We all get on and play together.
 
This young boy's response was, "No.  Have you ever played a lot of board games?  What about puzzles?  I love puzzles.  I'm really good at chain link puzzles."
 
I honestly think this boy does not play video games . . .  and that is awesome!  I love how simple his life is.  It's how my life was when I was a child.  Back to simpler times.
 
Then the conversation went something like this:
 
My son: "Do they really have slaughter houses on farms?"
 
Other boy: "I don't know about that, but I use to live on a farm."
 
My son: "How do they kill the animals?"
 
Other boy: "With an axe or shotgun."
 
Well, that was a turn in conversation!
 
Hope you have a great day and enjoy the simple things in life.
 
Vanessa

Saturday, April 13, 2013

Utah's April/May Plumbtickled Create

**Updated**

Time is just flying by!  But today I have sewing on my mind.  I was at Walmart and they must have just gotten in a new shipment of fabric.  So many cute prints!  Thankfully I only walked out of there spending a total of $17.  But I am all set to sew for the next Utah Plumbtickled Create scheduled for May 4th.
 
Here is what we will be sewing this time.  Kind of an accessory theme.  I was going to title it "Accessorize April", but alas, the first Saturday that works for everyone is in May.
 
Sewing Project #1
 
It's still a little chilly here in Utah, but not cold enough for those winter scarves.  Dana from Made has the perfect solution- a summer scarf!  Brilliant.  I already had the chance to sew one and it is super cute.  It was my first time using elastic thread.  I didn't even know it existed!
 
 
What You'll Need:
 
  • 1/2 yard of fabric (light-weight cotton, sear sucker, knit or linen)
  • elastic thread, but not necessary
Sewing Project #2
 
If you've been looking for a wallet that can hold everything, then this project is for you - The Have It All Wallet from Straight Stitch Society.  I am almost in serious need for a new wallet.  I'm pretty sure mine is going to break any day.  I can hardly wait to do this one because of how adorable it is and I will be sewing my very first zipper!
 
 
What You'll Need:
 
44/45"-wide quilting cotton, linen, or other lightweight woven fabrics:
  • 1/2 yd or 1 fat quarter fabric A (outside of wallet)
  • 1/2 yd fabric B (interior pockets)
  • 5" x 5" scrap fabric C (bow, View 1)
  •  
  • 1/2 yd of 20"-wide lightweight, non-woven fusible interfacing
  • 7" x 13" extra firm woven sew-in interfacing
  • One coordinating regular (coil) zipper 7" long or longer (provided)
  • Coordinating thread
  • One sew-in or set-in snap (approximately 7/16" diameter — size 3 sew-in or size 16 set-in) (provided)
 Sewing Project #3
 
I can never resist a new purse or tote.  There are so many uses for them!  This tote rolls up and can fit nicely inside of your everyday purse.  Then you can pull it out for library books, groceries, church or any other outing.  The Fold Up Tote has a full tutorial by Zaaberry.


What You'll Need:
  • main body of the bag: 2 fabric pieces 15 x 10 inches
  • contrasting top of bag: 2 fabric pieces 15 x 6 inches
  • handles: 2 fabric pieces 4 x 16 inches
  • 6 inches of thin elastic
  • 1 button
****
 
I hope this inspires some of you to dust off ye ole sewing machine and get sewing.  If you sew any of the projects, please send pictures!  And I'll be posting our finished products after we have our Plumbtickled Create Day. 
 
 
Smiles,
Vanessa

(Pictures are originals from bloggers' sites.)